Japanese comfort food is the gap between what most people think Japanese cooking is and what it actually is in a real Japanese home on a Tuesday night.
Most people’s mental image of Japanese food is sushi, ramen, and the elaborate presentations of high-end Japanese restaurants. This image is real but unrepresentative. What Japanese families cook on weeknights, what appears in bento boxes, in school canteen lunches, in the small izakaya around the corner, is a different and considerably more accessible tradition. Karaage fried chicken that is better than any takeout you have had. A bowl of oyakodon assembled in fifteen minutes. Tonkatsu with shredded cabbage and a tart brown sauce. Tamagoyaki made sweet and savory in a pan each morning. These are the dishes that Japanese children grow up eating and that Japanese adults cook without a second thought.
This is part of the Japanese recipes collection. These recipes use the core pantry items from the Japanese pantry guide, soy sauce, mirin, sake, miso and short-grain rice. Have those in the kitchen and every recipe here becomes straightforward.
Table of Contents
1. Karaage: Japanese Fried Chicken
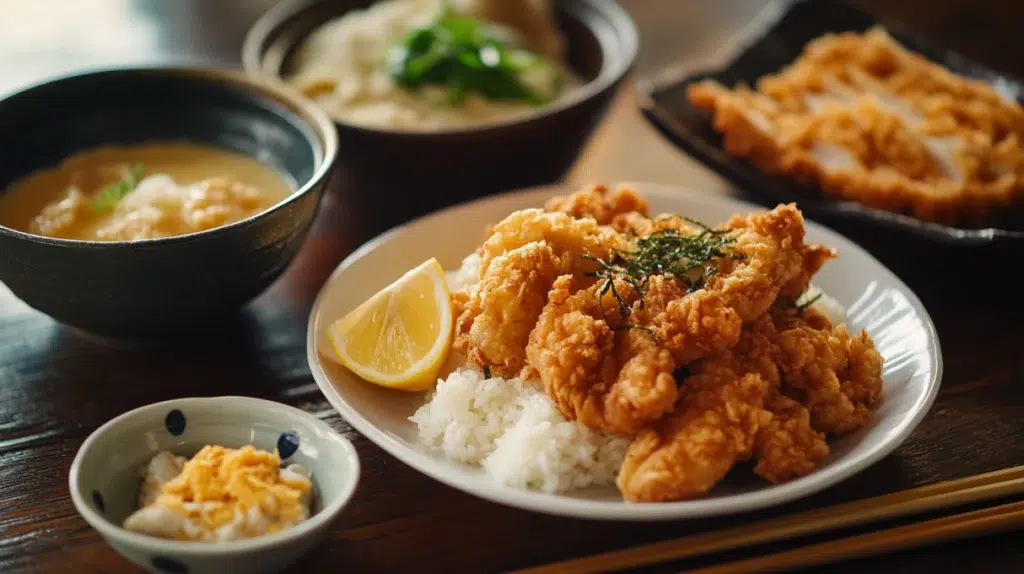
Karaage (pronounced kah-rah-ah-geh) is Japanese fried chicken, chicken thighs marinated in soy sauce, sake and ginger, coated in potato starch or cornflour, and fried twice to a shattering, deeply golden crust with supremely juicy meat inside. It is, without qualification, one of the greatest fried chicken preparations in the world.
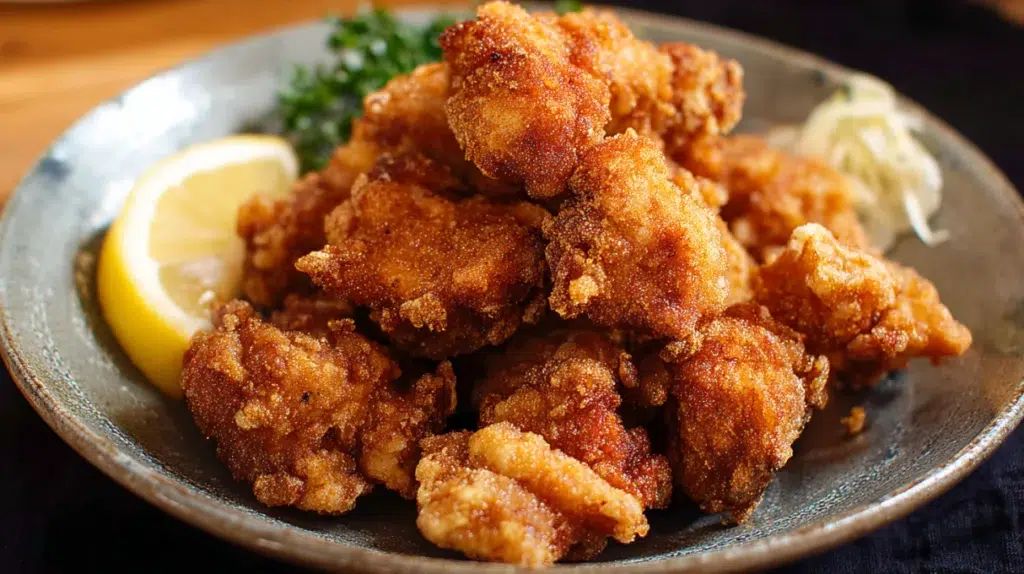
The differences from American fried chicken: smaller pieces (bite-sized), potato starch rather than flour for a lighter and crispier coating, a double-fry for extraordinary crunch, and a marinade that seasons the meat from within rather than relying on a heavily seasoned coating. Served with Kewpie mayo and a wedge of lemon. Eaten immediately.
The double-fry is non-negotiable. First fry at 160°C / 320°F for 3 minutes, cooks the chicken through. Rest 3 minutes. Second fry at 180°C / 355°F for 90 seconds, creates the shattering crust. Without the second fry, the coating is merely crispy. With it, the coating is extraordinary.
Ingredients (serves 4)
- 700g (1.5 lbs) boneless skin-on chicken thighs, skin-on is essential for flavor and juiciness. Boneless thighs are easier to eat but bone-in work equally well.
- 3 tablespoons soy sauce
- 2 tablespoons sake
- 1 tablespoon fresh ginger, grated
- 2 cloves garlic, grated
- 1 teaspoon sesame oil
- 100g (¾ cup) potato starch, or cornflour as a substitute, though potato starch produces a noticeably lighter crust
- Neutral oil for frying, vegetable, canola or sunflower
To serve: Kewpie mayonnaise, lemon wedges, shredded cabbage
Method:
Cut the chicken thighs into roughly 4cm pieces, irregular shapes are fine and expected. Combine soy sauce, sake, ginger, garlic and sesame oil in a bowl. Add the chicken, toss to coat thoroughly. Marinate 30 minutes minimum, 2 hours in the refrigerator is better.
Heat oil in a wok or deep saucepan to 160°C / 320°F. While the oil heats, lift each piece of chicken from the marinade, letting the excess drip off, and coat thoroughly in potato starch. Shake off any loose starch.
First fry: Lower the chicken in batches, do not crowd the pan. Fry 3 minutes until pale golden and cooked through. Remove to a wire rack. Rest 3 minutes while the crust settles and the interior temperature equalises.
Second fry: Raise the oil temperature to 180°C / 355°F. Return the chicken in batches and fry 60-90 seconds until deeply golden and the crust sounds hollow when tapped. Remove immediately to the wire rack. Season with a pinch of salt.
Serve at once. Karaage left to sit loses its crust within 10 minutes. Plan accordingly.
2. Tonkatsu: Panko-Breaded Pork Cutlet
Tonkatsu is a thick pork loin or pork fillet cutlet, pounded thin, breaded in panko and deep-fried to a golden crust. Served with shredded raw cabbage, a wedge of lemon and tonkatsu sauce, a thick, tart, complex brown condiment that sits between Worcestershire sauce and barbecue sauce in flavor.
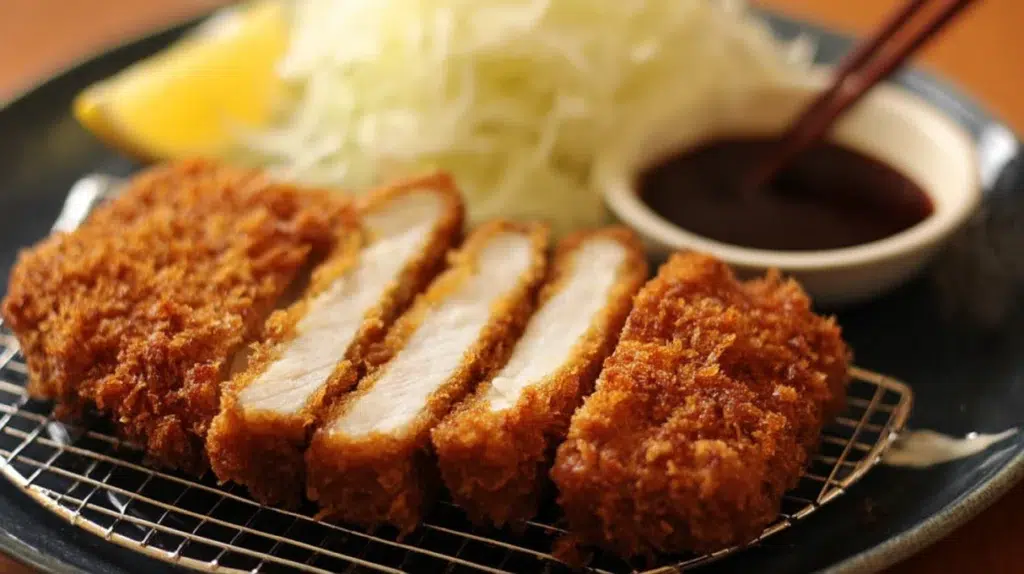
The panko crust is what makes tonkatsu specifically Japanese rather than a generic schnitzel. Panko’s large, open flakes create a crust with far more air in it than fine western breadcrumbs, lighter, crunchier, and with a specific Japanese character. Do not substitute with regular breadcrumbs.
Ingredients (serves 4)
- 4 pork loin steaks, approximately 150g (5 oz) each, about 1.5cm thick
- Salt and white pepper
- 50g (6 tablespoons) plain flour
- 2 large eggs, beaten
- 100g (2 cups) panko breadcrumbs
- Neutral oil for frying, enough for at least 4cm depth in the pan
For the tonkatsu sauce (or buy Bulldog brand):
- 4 tablespoons Worcestershire sauce
- 2 tablespoons tomato ketchup
- 1 tablespoon oyster sauce
- 1 teaspoon soy sauce
- 1 teaspoon sugar
Method:
Score the fat on the edge of each pork steak with 3-4 small cuts, this prevents the cutlet from curling in the oil. Pound each steak gently with a rolling pin or meat mallet to an even 1cm thickness. Season both sides with salt and white pepper.
Set up a breading station: flour in one shallow dish, beaten egg in a second, panko in a third. Coat each steak: flour first (shake off excess), egg (let excess drip), panko (press firmly into both sides to ensure a thick, even coating). Rest the breaded steaks on a rack for 5 minutes before frying, this helps the coating adhere.
Heat oil to 170°C / 340°F in a wide pan or wok. Fry one or two steaks at a time for 3-4 minutes per side until deep golden brown and cooked through (internal temperature 63°C / 145°F). Drain on a wire rack, never on paper towels, paper traps steam and softens the crust.
Rest 2 minutes. Slice into 2cm strips, this is the traditional presentation, making it easy to eat with chopsticks. Serve over a mound of finely shredded raw cabbage (mandoline or very sharp knife) with lemon and tonkatsu sauce.
3. Oyakodon: Chicken and Egg Rice Bowl
Oyakodon translates literally as “parent and child rice bowl”, oya meaning parent (the chicken), ko meaning child (the egg). The name is a perfect description of the dish: chicken pieces simmered in a sweet-savory dashi broth with onion, then bound with a lightly set egg and served over rice. It is one of the most satisfying fifteen-minute meals in any cuisine.

The egg technique is the key detail. The egg is added in two stages, first half the beaten egg to form the base of the custard, then the remaining half after 30 seconds so some of it remains barely set, creating a mixture of textures from fully cooked to just-set silky ribbons. The dish is served the moment this second addition has barely set. Waiting longer overcooks the egg and loses the specific soft, custardy quality that makes oyakodon what it is.
Ingredients (serves 2)
- 300g (10 oz) boneless skinless chicken thighs, cut into 2cm pieces
- 3 large eggs, beaten, lightly, just combined, not foamy
- 1 medium onion, halved and cut into thin half-moons
- 200ml (¾ cup) dashi, instant dashi powder dissolved in hot water works well here
- 3 tablespoons soy sauce
- 2 tablespoons mirin
- 1 tablespoon sake
- 1 tablespoon sugar
- 2 bowls freshly cooked short-grain rice
To serve: 2 spring onions finely sliced, a sheet of nori cut into thin strips, togarashi (Japanese chilli flakes) if desired
Method:
Combine dashi, soy sauce, mirin, sake and sugar in a small frying pan or the traditional oyakodon pan (an oyakodon pan is shallow with a lid, approximately 20cm diameter, a small frying pan with a lid works perfectly).
Bring to a simmer over medium heat. Add the onion and cook 3 minutes until just softened. Add the chicken pieces in a single layer. Cook 4-5 minutes, turning once, until the chicken is cooked through and the broth has reduced slightly.
Reduce heat to low. Add half the beaten egg in a slow, circular stream, distributing it evenly. Cover and cook 30 seconds until the egg is just beginning to set at the edges but still liquid in the center. Add the remaining egg in a thin stream. Cover again and cook 20-30 seconds, the egg should be barely set, custard-soft, still slightly liquid in the very center.
Slide the entire contents immediately over a bowl of hot rice. Scatter spring onion and nori strips. Serve at once.
4. Nikujaga: Japanese Meat and Potato Stew
Nikujaga (niku = meat, jaga = potato) is often described as Japan’s version of pot roast, a simple, deeply satisfying one-pot stew of thinly sliced beef, potatoes, onions and shirataki noodles simmered in sweetened soy and dashi. It is one of the most widely eaten home dishes in Japan, associated specifically with home cooking, mothers, and the comfort of familiar flavors.
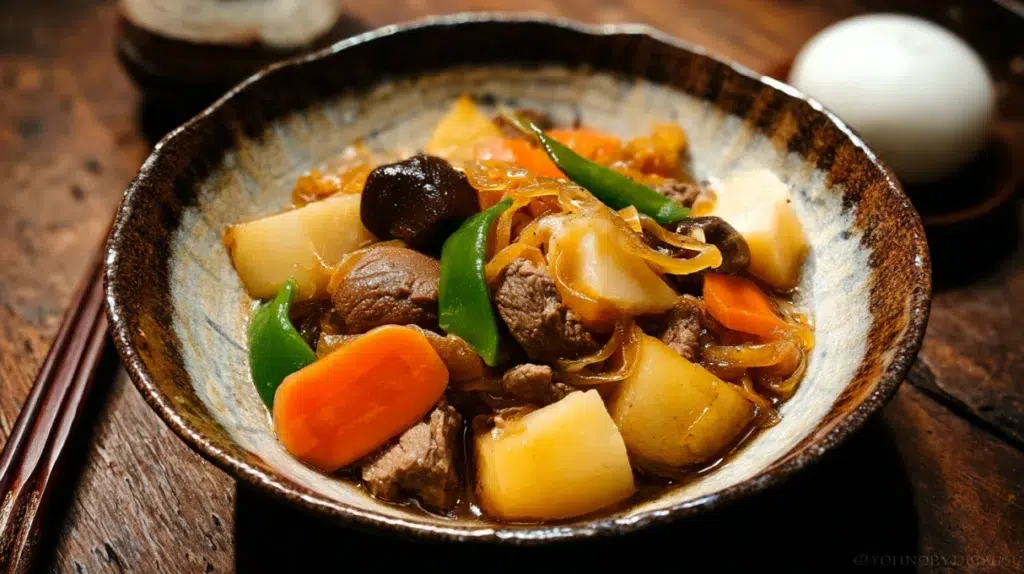
Sukiyaki, thinly sliced beef cooked at the table in soy sauce, sugar and stock with tofu, shiitake mushrooms and vegetables, entered Japanese cuisine only after contact with the West in the 1860s lifted centuries of Buddhist dietary restrictions. Nikujaga belongs to the same family of beef-and-soy simmered dishes that emerged in Japan after beef became acceptable to eat, an entire category of Japanese cooking that simply did not exist before the Meiji era.
Ingredients (serves 4)
- 300g (10 oz) beef, thinly sliced rib-eye, chuck or sukiyaki beef (sold pre-sliced at H Mart and Asian grocery stores)
- 600g (1.3 lbs) waxy potatoes, peeled and cut into large chunks, Yukon Gold or similar
- 1 large onion, cut into 8 wedges
- 200g (7 oz) shirataki noodles, drained and rinsed, or glass noodles as substitute
- 100g (3.5 oz) frozen peas or edamame
- 500ml (2 cups) dashi
- 4 tablespoons soy sauce
- 3 tablespoons mirin
- 2 tablespoons sake
- 1 tablespoon sugar
- 1 tablespoon vegetable oil
Method:
Heat the oil in a medium heavy-bottomed pot over medium-high heat. Add the beef in small amounts and cook briefly, stirring, just until it changes color, 1-2 minutes. Remove and set aside.
Add the onion wedges to the same pot and cook 2 minutes. Add the potato chunks. Add the dashi, soy sauce, mirin, sake and sugar. Bring to a simmer. Add the shirataki noodles and the partially cooked beef.
Cover and simmer over low-medium heat 20-25 minutes until the potatoes are completely tender and the broth has reduced to a glossy, intensely flavored liquid that barely covers the vegetables. Add the peas for the final 2 minutes. The liquid should be almost fully absorbed by the time the dish is ready, not soup, not dry, but richly glazed vegetables and meat.
Serve in deep bowls over rice or with rice alongside.
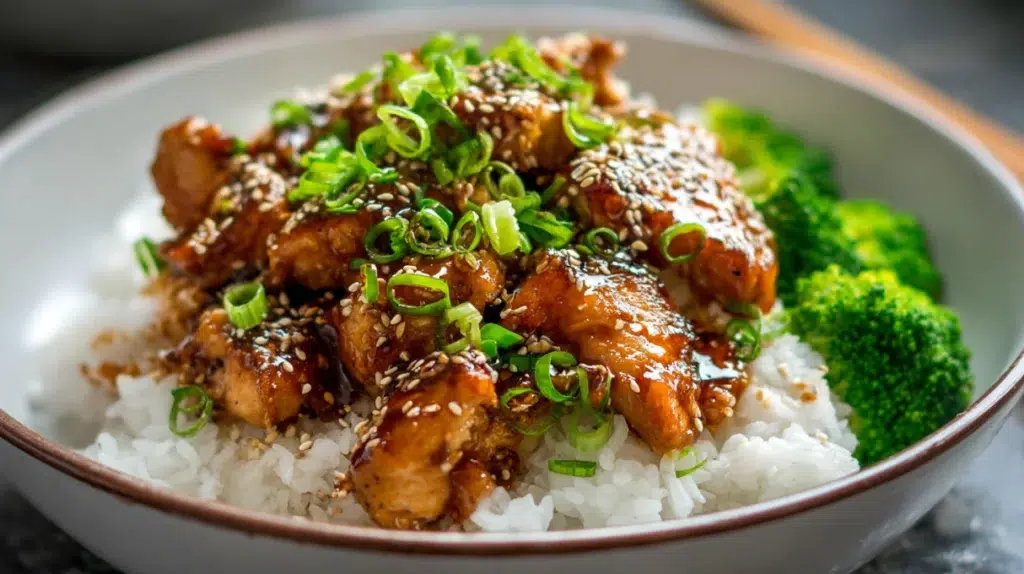
5. Teriyaki Chicken: The Real Version
Teriyaki refers to foods grilled with a highly flavored glaze of soy sauce and sake or mirin, in westernized Japanese cooking the sauce is often used as a marinade as well. The key word is grilled, authentic Japanese teriyaki is a cooking technique, not a thick sauce. The glaze is applied during cooking, in thin layers, each one caramelizing against the heat of the grill or pan before the next layer goes on. The result is a thin, lacquered, intensely flavored coating, nothing like the thick sweet brown sauce sold in bottles at American supermarkets.
Ingredients (serves 4)
- 4 boneless skin-on chicken thighs
- 4 tablespoons soy sauce
- 4 tablespoons mirin
- 2 tablespoons sake
- 1 tablespoon sugar
- 1 teaspoon vegetable oil
Method:
Combine soy sauce, mirin, sake and sugar in a small pan. Simmer over medium heat 3-4 minutes, stirring, until the sugar dissolves and the sauce reduces very slightly. Set aside, this is your teriyaki glaze.
Prick the chicken skin all over with a fork. Heat the oil in a heavy frying pan over medium-high heat. Place the chicken skin-side down. Press with a spatula for the first minute to ensure full contact between skin and pan. Cook skin-side down 6-7 minutes until the skin is deep golden and much of the fat has rendered. Flip. Cook 3 minutes on the flesh side.
Reduce heat to medium-low. Add half the teriyaki glaze. Cook 1 minute, spooning the glaze over the chicken continuously as it caramelizes. Add the remaining glaze. Cook another minute until the sauce reduces to a sticky, lacquered coating and the chicken is fully cooked through.
Rest 2 minutes. Slice and serve over rice with the pan juices.
6. Tamagoyaki: Japanese Rolled Omelette
Tamagoyaki (tamago = egg, yaki = grilled or cooked) is a sweetened, layered rolled omelette cooked in a rectangular pan and served as a breakfast side dish, in bento boxes, and as a sushi topping. The flavor is gentle, slightly sweet, slightly savory, with a specific soft, layered texture unlike any other egg preparation.
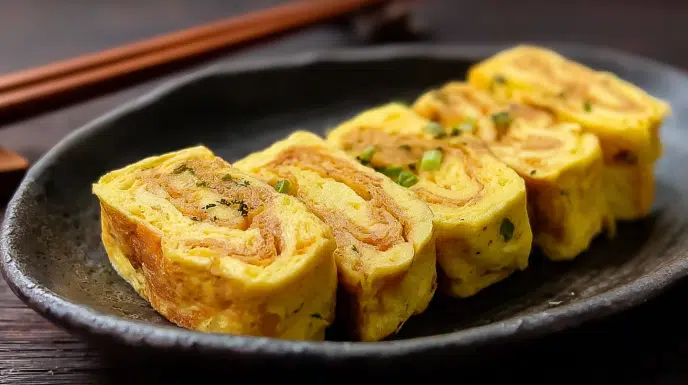
The technique requires a tamagoyaki pan, a small rectangular non-stick pan, and three or four rounds of adding egg, letting it partially set, rolling it to one side, adding more egg beneath, and rolling again. The result is a cylinder of layered egg that when sliced reveals beautiful golden spirals.
Ingredients (serves 2)
- 3 large eggs
- 1 tablespoon dashi
- 1 teaspoon soy sauce
- 1 teaspoon mirin
- 1 teaspoon sugar
- Pinch of salt
- Neutral oil for the pan
Method: Beat the eggs with dashi, soy sauce, mirin, sugar and salt until just combined. Heat a tamagoyaki pan over medium heat and brush lightly with oil. Pour in one-third of the egg mixture, tilting to coat evenly. When the egg is just set at the edges but still liquid on top, use chopsticks or a spatula to roll it toward you in 3-4 folds. Push the roll to the far end of the pan. Oil the empty space lightly. Pour in another third of the egg, lifting the roll to let the raw egg flow underneath. Roll the existing omelette over the new egg as it sets, incorporating the layers. Repeat with the final third. The finished tamagoyaki should be a firm, golden cylinder. Roll tightly in cling film or a sushi mat and rest 5 minutes to set the shape. Slice into 2cm rounds.
7. Miso Soup: The Daily Bowl
Miso soup is not a recipe so much as a practice, made fresh every morning in most Japanese households, assembled from dashi and miso in minutes, with whatever ingredients are on hand. Master this and you have a nutritious, warming, deeply satisfying daily ritual that takes four minutes.
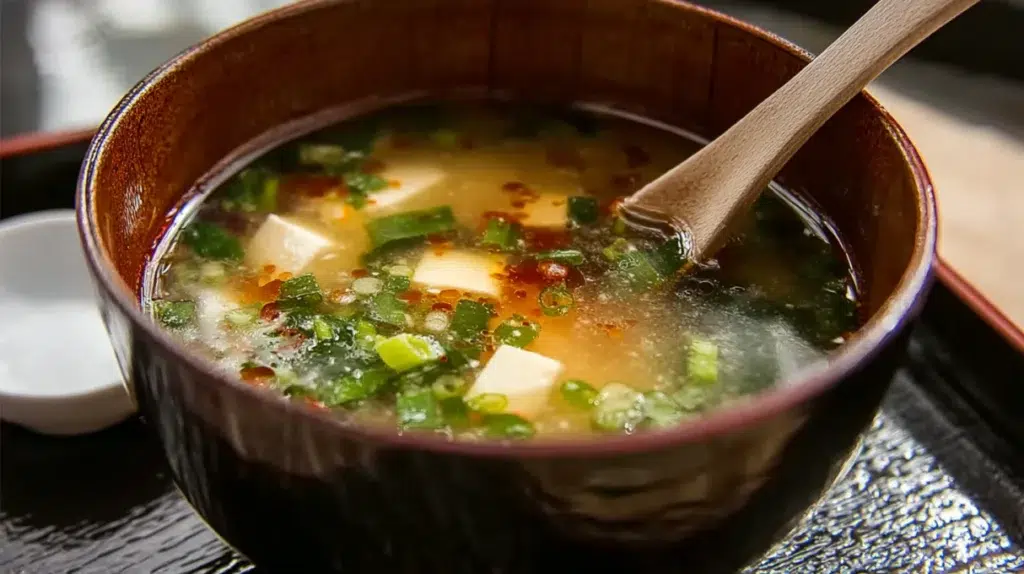
The method: Heat 400ml dashi to just below a simmer. Do not boil, high heat destroys the beneficial enzymes in miso. Place 2 tablespoons of miso in a small strainer and lower it into the dashi, pressing with a spoon to dissolve it into the liquid without lumps. Add your chosen ingredients: small cubes of silken tofu and dried wakame seaweed is the most classic combination. Spring onions scattered on top. Serve immediately in small lacquer bowls.
Other combinations: Clam miso soup (asari jiru), small clams cooked in water until they open, miso added off heat, spring onion garnish. Potato and onion. Mushroom and tofu. Daikon and aburaage (fried tofu skin). Whatever is in the refrigerator becomes an acceptable miso soup ingredient.
FAQ About Japanese Comfort Food
What is the difference between karaage and regular fried chicken?
The marinade penetrates the meat from within rather than coating it from without. Potato starch rather than flour creates a lighter, crispier crust. The double-fry is used by most karaage cooks for extra crunch. The pieces are smaller, bite-sized rather than whole pieces, making the ratio of crust to meat higher.
Can tonkatsu be made with pork fillet instead of loin?
Yes, pork fillet (tenderloin) produces a leaner, more delicate result. It cooks faster (2-3 minutes per side) and is more forgiving. Pork loin has slightly more flavor and a better chew when cooked correctly. Both are traditional.
Why is my oyakodon egg rubbery?
Overcooked. The egg should be taken off heat when still slightly liquid in the center, it continues cooking from residual heat as you transfer it to the rice bowl. Err on the side of undercooking the egg. You can always cover it briefly with the bowl itself to finish if needed.
What is shirataki and where do I find it?
Shirataki are translucent, gelatinous noodles made from konjac yam. They have almost no flavor of their own but absorb the flavors of whatever they are cooked in. Found in sealed bags in the refrigerated section of H Mart and Asian grocery stores. Rinse thoroughly before using and dry-fry briefly in a hot pan to remove the slightly odd initial aroma.
Planning your week? Add karaage night or oyakodon to your weekly meal planner, both come together in under 30 minutes once you have the pantry sorted.
More From the Japanese Recipes Collection: