This kimchi recipe is the one that changed how I think about cooking.
Not because kimchi is the most technically difficult thing I have ever made, it is not. Not because it requires specialist equipment or rare ingredients, it requires neither. But because making kimchi from scratch for the first time taught me something that I had understood intellectually but had never truly felt before: that time is an ingredient. That patience does something to food that heat and technique simply cannot replicate. That a jar of salted cabbage left on a counter for four days becomes something completely different from what it was when you packed it.
That transformation is extraordinary to witness. And it is why kimchi, as the foundation of Korean recipes is where I always tell people to start when they want to understand Korean cooking properly.
If you have only ever eaten store-bought kimchi, I want you to brace yourself. What you are about to make is not the same product. It is alive in a way that processed kimchi is not. It is complex in a way that shelf-stable kimchi cannot be. It is, frankly, one of the most remarkable things you can produce in a home kitchen with about 45 minutes of active work and the patience to wait.
Let’s make it.
What Is Kimchi? And Why Does It Matter
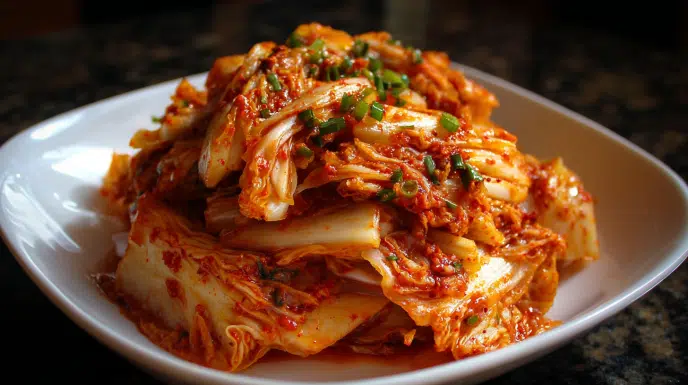
Kimchi is fermented vegetables, most commonly napa cabbage seasoned with gochugaru, garlic, ginger, and fish sauce, packed tightly into jars, and left to ferment at room temperature until it reaches the right level of sourness, complexity and depth.
It is the national dish of Korea in the most literal possible sense, present at virtually every Korean meal, made in every Korean household, and so central to Korean food culture that the communal practice of making it together, called Kimjang, has been recognized by UNESCO as Intangible Cultural Heritage of Humanity.
There are hundreds of varieties of kimchi. Baechu kimchi made with napa cabbage, is the most common and the one you will make today. But radish kimchi (kkakdugi), water kimchi (mul kimchi), cucumber kimchi (oi sobagi), the list goes on. Once you understand the method for baechu kimchi, the others become intuitive variations.
Kimchi has significant documented probiotic benefits, the lactobacillus bacteria produced during fermentation support gut health in ways that have been studied and confirmed by nutritional researchers. But honestly? You should make it because it tastes extraordinary, not because it is good for you. The health benefits are a bonus.
Why Make Kimchi at Home Instead of Buying It
Fair question. Good store-bought kimchi exists. Brands like Wildbrine and Mama O’s make reasonable versions available at Whole Foods. So why spend the time making your own?
Three reasons.
First: flavor. Homemade kimchi at peak fermentation (around 1-2 weeks) has a complexity and brightness that no commercial kimchi matches. The garlic is sharper. The gochugaru is more present. The sourness is cleaner. It tastes alive because it is alive.
Second: control. When you make your own kimchi you control the heat level, the salt level, the fermentation time, and the ingredient quality. You can make it milder for people who are new to it. You can make it fiery for people who want the full experience. You can use the best gochugaru you can find rather than whatever a manufacturer sources at scale.
Third: understanding. Making kimchi teaches you fermentation in a way that reading about it never will. You will understand why salt matters. Why temperature matters. Why time matters. That understanding transfers to everything else you cook, not just Korean food.
Ingredients
Makes 1 large jar (about 2kg / 4.4 lbs) | Active time: 45 minutes | Fermentation: 1-5 days at room temperature, then refrigerate
For the cabbage:
- 1 large napa cabbage, about 2kg (4.4 lbs). Napa cabbage is nutritionally dense and has a high water content that is essential to the fermentation process, do not substitute with regular cabbage.
- ½ cup (130g) non-iodized salt, kosher salt or sea salt. Do not use iodized table salt, iodine inhibits the fermentation bacteria.
- Water, enough to submerge the cabbage initially
For the kimchi paste:
- 1 cup (100g) gochugaru, Korean red pepper flakes. This is non-negotiable, see note below on where to find it.
- 1 whole head of garlic (about 10-12 cloves), minced fine or grated
- 1 tablespoon fresh ginger, grated
- 3 tablespoons fish sauce, gives depth and umami. Omit and add 1 extra tablespoon soy sauce for vegan kimchi.
- 1 tablespoon soy sauce
- 1 tablespoon sugar, white or brown
- 4 green onions, cut into 2-inch pieces
- 1 medium daikon radish (about 300g), peeled and cut into thin matchsticks, adds crunch and flavor complexity
- 2 tablespoons toasted sesame seeds
Equipment:
- Large bowl for salting the cabbage
- Large pot or second bowl for rinsing
- Clean glass jar or airtight container, large enough for 2kg of kimchi
- Disposable gloves, the gochugaru will stain your hands for days. Learn from my mistakes.
How to Make Kimchi Recipe: Step by Step
Step 1: Salt the Cabbage (30 minutes + 1-2 hours resting)
Cut the napa cabbage into quarters lengthwise through the root. Then cut each quarter crosswise into roughly 5cm (2-inch) pieces. You want large-ish pieces, they will compact significantly during salting and fermentation.
In a very large bowl, toss the cabbage pieces with the salt, working it between the leaves with your hands. The salt will start pulling moisture from the cabbage immediately. Leave it to rest for 1-2 hours, tossing every 30 minutes, until the cabbage has wilted significantly and released a pool of liquid at the bottom of the bowl. It should be limp and flexible, not crunchy.
This salting step is not just about flavor, it is structurally important. The salt draws out excess moisture, partially breaks down the cell walls of the cabbage, and creates the environment that beneficial fermentation bacteria need to thrive. Under-salting produces watery, poorly textured kimchi that ferments unevenly. Over-salting produces kimchi that is unpleasantly salty and ferments too slowly. The amount above is calibrated for a 2kg cabbage, scale proportionally if yours is larger or smaller.
Rinse the salted cabbage thoroughly under cold water, three rinses minimum, tasting after each one. The cabbage should taste pleasantly seasoned, not salty. Squeeze handfuls firmly to remove as much water as possible. Set aside in a colander to drain while you make the paste.
Step 2: Make the Kimchi Paste (10 minutes)
Put on your gloves. I said this in the ingredients list and I will say it again here because I know you are considering skipping the gloves. Do not skip the gloves. Gochugaru is bright red and it stains everything it touches, including your hands for 24-48 hours. Gloves. Non-negotiable.
In a large bowl, combine the gochugaru, minced garlic, grated ginger, fish sauce, soy sauce, and sugar. Mix until it comes together into a thick, fragrant, deeply red paste. Taste it, it should be spicy, garlicky, slightly sweet, with a deep fermented-chile aroma. If it seems too thick, add a tablespoon of water to loosen it slightly.
Add the daikon matchsticks and green onion pieces to the paste and toss to coat. These vegetables go into the kimchi jar alongside the cabbage and ferment with it, adding texture and flavor variety to the finished product.
Step 3: Combine and Pack (10 minutes)
Add the drained cabbage to the bowl with the paste and vegetables. Using your gloved hands, this is the only effective tool for this job, work the paste thoroughly through every piece of cabbage. You want every surface coated, every leaf touched by the paste. Take your time. This mixing is important.
Taste a piece. It should be spicy, salty, deeply flavored. If it needs more gochugaru, add it now. If it needs more salt, add a pinch and mix again.
Pack the kimchi tightly into your clean jar or container, pressing down firmly as you go to eliminate air pockets. The kimchi will release more liquid as you pack it, this liquid (called kimchi juice or brine) is important and should stay with the kimchi, not be discarded. Press until the brine rises to just below the surface of the vegetables. Leave about 3-4cm of headspace at the top of the jar, the kimchi will expand as it ferments and produces gas.
Seal the jar. Label it with today’s date.
Step 4: Ferment (1-5 days at room temperature)
Leave the sealed jar at room temperatur, somewhere between 65-75°F (18-24°C) is ideal. Cooler temperatures slow fermentation. Warmer temperatures speed it up. Nashville summers mean my kimchi ferments faster in July than in December, adjust your timing based on your kitchen temperature.
Open the jar once a day and press the vegetables down firmly with a clean spoon, this releases the gas produced by fermentation and keeps the vegetables submerged in their brine. You will hear and see small bubbles. This is fermentation happening. This is correct. This is what you want.
After 1-2 days, taste the kimchi. It will have softened further and developed a slight tanginess. At this stage it is young kimchi, fresh tasting, still quite spicy and garlicky, mildly sour.
After 3-5 days the sourness will have developed significantly. The kimchi will taste more complex, more rounded, more alive. This is when most people consider it ready to refrigerate.
When you are happy with the sourness level, transfer the jar to the refrigerator. Cold temperature slows fermentation dramatically, essentially pausing it. The kimchi will continue to develop slowly in the fridge, becoming more sour and complex over weeks and months.
Step 5: Eat and Enjoy
Kimchi is ready to eat at any stage, young (1-2 days), fresh (3-5 days), or fully fermented (1-2 weeks in the fridge). Each stage has a different character and different best uses.
Young kimchi (1-2 days): Bright, fresh, spicy. Best eaten as banchan alongside rice and other dishes.
Fresh kimchi (3-5 days): More complex, slightly sour, still crunchy. The most versatile stage as banchan, in fried rice, in Korean pancakes (kimchijeon).
Fully fermented kimchi (2+ weeks): Deeply sour, complex, slightly softened. Best for cooking, kimchi jjigae (stew), kimchi fried rice, kimchi pancakes. The sourness that is too sharp to eat directly becomes mellow and extraordinary when cooked.
Claire’s Notes: What I Learned Making This
On gochugaru: This is the ingredient where there is genuinely no good substitute. Gochugaru has a specific flavor, mildly spicy, slightly sweet, deeply savory, that generic red pepper flakes cannot replicate. Find it at Korean grocery stores (H Mart), Asian supermarkets, or order online. It keeps well in the freezer for up to a year.
On the salt: Non-iodized salt only. Kosher salt and sea salt both work. The iodine in regular table salt inhibits the lactobacillus bacteria responsible for fermentation, your kimchi will ferment poorly or not at all if you use iodized salt.
On the garlic: The quantity seems excessive. It is not. Korean cooking uses extraordinary amounts of garlic and kimchi is no exception. Do not reduce it. The garlic mellows significantly during fermentation.
On making it vegan: Replace fish sauce with an equal amount of soy sauce or a combination of soy sauce and a small amount of nori (seaweed) soaked in water to approximate the oceanic depth that fish sauce provides. The result is genuinely good, different but excellent.
On fermentation speed: Kimchi ferments faster in warm kitchens and slower in cool ones. In summer, check it after 24 hours. In winter, it may need 4-5 days at room temperature to reach the sourness level you want. Trust your taste buds over the clock.
On old kimchi: Kimchi that has been fermenting for months, what Koreans call mukeunji is extremely sour and pungent and is specifically used for cooking rather than eating raw. It makes the most extraordinary kimchi jjigae you will ever taste. Do not throw away old kimchi. Cook with it.
What to Make With Your Kimchi
Once your kimchi is ready, the complete Korean recipes collection opens up completely. Almost every Korean dish either uses kimchi or is eaten alongside it.
Most immediate uses:
- Serve as banchan alongside rice and any Korean main dish
- Korean BBQ at home, kimchi is the essential accompaniment
- Kimchi fried rice, day-old rice, older kimchi, a fried egg on top
- Kimchi pancakes (kimchijeon), chopped kimchi in a savory batter, pan-fried until crispy
- Kimchi jjigae, kimchi stew with tofu and pork, one of the great comfort foods
Frequently Asked Questions
How long does homemade kimchi last?
Properly made and stored kimchi lasts for months in the refrigerator, some Koreans keep kimchi for a year or more, using older kimchi for cooking rather than eating raw. The sourness increases over time. As long as it smells good (sour and fermented, not rotten) it is safe to eat.
Is it normal for kimchi to bubble?
Yes, completely normal and a sign of healthy fermentation. The bubbles are carbon dioxide produced by the lactobacillus bacteria doing their work. Press the vegetables down daily to release the gas buildup and prevent the jar from overflowing.
My kimchi is not sour yet, what is wrong?
Nothing, it just needs more time. Fermentation speed varies with temperature. If your kitchen is cool, give it another day or two at room temperature before refrigerating.
Can I reduce the amount of gochugaru for a milder version?
Yes, halving the gochugaru produces a noticeably milder kimchi. The color will be less vivid and the flavor slightly less complex, but it is still excellent and much more approachable for people new to spicy food.
Why does my kimchi smell very strong?
Kimchi smells powerfully fermented, that is correct and expected. If it smells sour and garlicky and funky in a way that seems intentional, it is fine. If it smells genuinely rotten, like something has gone wrong rather than fermented correctly, discard it. Trust your nose. Healthy fermented food smells sour and alive, not rotten.

Homemade Baechu Kimchi
- Total Time: 5 days
- Yield: 1 large jar (about 2kg / 4.4 lbs) 1x
- Diet: Vegan
Description
Learn how to make authentic kimchi from scratch using napa cabbage and a mix of flavorful ingredients.
Ingredients
- 1 large napa cabbage (about 2kg / 4.4 lbs)
- ½ cup (130g) non-iodized salt (kosher or sea salt)
- Water (enough to submerge the cabbage)
- 1 cup (100g) gochugaru (Korean red pepper flakes)
- 1 whole head of garlic (about 10–12 cloves), minced or grated
- 1 tablespoon fresh ginger, grated
- 3 tablespoons fish sauce (or omit and add 1 extra tablespoon soy sauce for vegan)
- 1 tablespoon soy sauce
- 1 tablespoon sugar (white or brown)
- 4 green onions, cut into 2-inch pieces
- 1 medium daikon radish (about 300g), peeled and cut into thin matchsticks
- 2 tablespoons toasted sesame seeds
Instructions
- Salt the cabbage: Cut the napa cabbage into quarters lengthwise. Then cut each quarter crosswise into roughly 5cm (2-inch) pieces. Toss with salt, working it between the leaves. Let it rest for 1-2 hours, tossing every 30 minutes.
- Rinse the salted cabbage thoroughly under cold water, at least three times, until the taste is pleasantly seasoned. Squeeze out excess water.
- Make the kimchi paste: In a large bowl, combine gochugaru, minced garlic, grated ginger, fish sauce, soy sauce, and sugar. Mix until it becomes a thick paste.
- Add the daikon and green onion pieces to the paste and toss to combine.
- Combine the drained cabbage with the paste and vegetables, making sure every piece is coated. Pack the kimchi tightly into a clean jar, pressing down to eliminate air pockets.
- Seal the jar and label it with the date. Let it ferment at room temperature for 1-5 days, testing daily for the desired sourness.
- Refrigerate the kimchi once it reaches the desired sourness level.
- Enjoy your kimchi at any fermentation stage or use it in various Korean dishes.
Notes
Wear gloves when handling gochugaru as it can stain skin. Store kimchi in the refrigerator for prolonged freshness.
- Prep Time: 45 minutes
- Cook Time: 0 minutes
- Category: Fermented Food
- Method: Fermenting
- Cuisine: Korean
Nutrition
- Serving Size: 1 serving
- Calories: 50
- Sugar: 1g
- Sodium: 500mg
- Fat: 1g
- Saturated Fat: 0g
- Unsaturated Fat: 1g
- Trans Fat: 0g
- Carbohydrates: 10g
- Fiber: 2g
- Protein: 2g
- Cholesterol: 0mg